Taking a template
We also need photos of:
- the whole horse, side on, standing square
- close up photos either side of the wither region (picture 10 would be a good example, minus the arm and flexi curve)
- one standing on something higher - as long as the horse is safe to do so - looking down on the saddle/wither region, ensuring that the horse's neck is straight ahead and not kinked to one side (as this can appear to show asymmetry when in fact it isn’t present).
It would be appreciated if photos were the right way up and of a good large size at 72 dpi, which should be a small document.
Step 1
Run you fingers along your horse's shoulder and find the back edge of the shoulder blade (Picture 1, Picture 2). Sometimes on a well covered horse this can take a bit of probing but you will feel the shoulder blade outline. You may find it easier to locate if you ask your helper to pick up the front foot and lift it forward - you will feel the movement of the shoulder blade.


Step 2
Fold you flexible curve (or whatever tool you choose to use) in half but leaving a loop in the end. (Picture 3)

Step 3
Place the flexible curve over the horse's back about 4cm behind the back edge of the shoulder blade. (Picture 4, Picture 5)


Step 4
Using one hand to keep the flexible curve in position; use the other hand to smooth the flexible curve against the horse's side. If you have a helper available then ask them to keep their finger on the top of the flexible curve to hold it in position whilst you go around to the other side of the horse. You will need to smooth the flexible curve against the horse's side again on this side. (Picture 6, Picture 7)


Step 5
You should now have the flexible curve sitting across the horse's wither. At this time, just re-check that the flexible curve has not moved too far away from the back of the shoulder blade. (Picture 8, Picture 9)


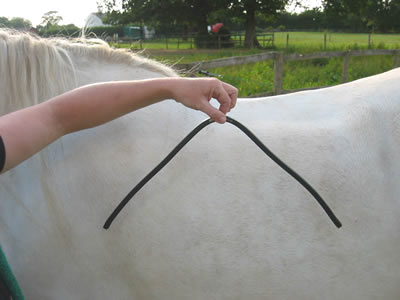
Step 6
Carefully remove the flexible curve from the horse's back and lay it on a piece of paper making sure you remember which side is left and right (Picture 10).
Step 7
Once you have the shape, draw round the underside of the flexicurve, all the way from the bottom of one side up to the highest point and around to the other bottom point, on a sheet of A4 paper. Please remember to mark left and right on your drawing. Add to the paper your name, address, contact numbers, horse's name, age, height, breed and date the template was taken. Scan the drawing at 100% size, this can then be sent as a jpeg or pdf attachment to an email, so that it will print the same size here.